How To Resize Images In Squarespace
When you're first getting used to Squarespace, it can be a little frustrating that each time you add an image, it is automatically the full-width of your page.
It's a simple fix.
Highlights
Add in your image content block.
Add spacer content blocks
Drag and drop spacers at either side of your image to reposition it. Hit Save.
Resizing Images In Squarespace
Use the teardrop shape to locate the section of your page/post that you'd like to add your image too.

Add in the Image content block.
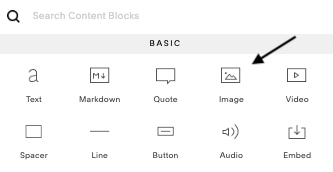
Upload your image and click apply.
You will see the image will take up the full-width of your page. To adjust this, add in a Spacer content block and drag it to the side of your image.
Hover over the line between the two content blocks and use your mouse to drag it to the side of your image.

If you would prefer to centre your image, add a space content block to either side of your image block.

The same approach can be used if you would like to add multiple images side by side. You simply add your images and then drag them until they are side by side.
A little more advanced...
If you want to get a little more creative, you can use a combination of spaces and images to mix things up and create some hierarchy.
Like this:

Now it’s your turn to get creative!
I hope you found this video valuable. If you did, subscribe for more good vibes or leave a comment below. I’ll see you there! :)